
How to Add a Before and After Photo to Your Website
In this video, I am going to show you how to add a before and after photo slider to your website. This is an excellent tool for showing off before and after images in sectors such as health and fitness, diet, wellness, hair, nails and beauty.
Table of Contents
To get started watch the video below and sign up for a 30 day free trial with GenUp Digital website builder.
Follow the video below for instructions on how to get started.
Video Transcript:
Hi, I’m Gavin from GenUp Digital. And in this video, I’m going to show you how to add a before and after picture to your website.
Step 1: Choose a website template
So the first thing you’re going to need to do is head over to genupdigital.com and select website builder, and choose a website template.
Now, for this example, we’re going to click on popular and choose the hair and beauty template. So sign up for an account and access your template.
And once you’ve logged in, you will see a page that looks like this, and then you can click on edit template.
So this is a pre-built hair and beauty template. So it’s good to go. You just need to change the images, upload, whatever image works for your, for you, for your website and change out the text, change out the copy throughout the website.
So in this example, you can see it’s a really nice looking website everything’s created for you already. And we’ve got 1, 2, 3, 5, 6 different pages.
And over on the left-hand side, here, we can add additional pages. We can add new features and widgets. We can add a blog because there’s not a blog on here at the moment, plus lots and lots and lots of other settings.
But in this example, what I’m going to show you how to do is add a before and after picture so that you can easily slide between the four and after picture to show off product changes or service changes based on it for an after image.
So I think probably the best place to show this will be in the gallery on this website, you might decide that you want to create a new page and show your before and after images off on the new page, in which case, click on pages and then new page, and then choose one of the page types here might be for example, that you want to choose blank page and then style the page yourself, or you can choose one of the predesigned pages.
Okay. If you’re going to add the feature to an existing page, then select the page that you want to edit.
In this example, I think probably gallery’s a good place to put a before and after picture. So here’s the gallery page.
Step 2: Add the before and after widget
And if we come over here to the left-hand side, we’ve got this option called widgets. Now the widgets are essentially the features, the building blocks of the website platform.
So you can see frequently used, which is the top here, popular widgets, basic widgets, which essentially the building blocks like adding text and buttons, columns, and lists, and so on media options, such as images and videos and audio, business options, social advanced, and some blog options as well.
And what we’re looking for here is an option called before and after photo, which now seems to evade me, where has it gone?
Yeah, so under media. So under media, we’ve got this before and after image. And the great thing about these widgets here is that you can just drag and drop them.
So we’re going to offer and select over this image here, hold down and drag it over. Now, I’m just going to put it here.
That’s probably not the best place to put it. You might want to put it somewhere more appropriate on your website.
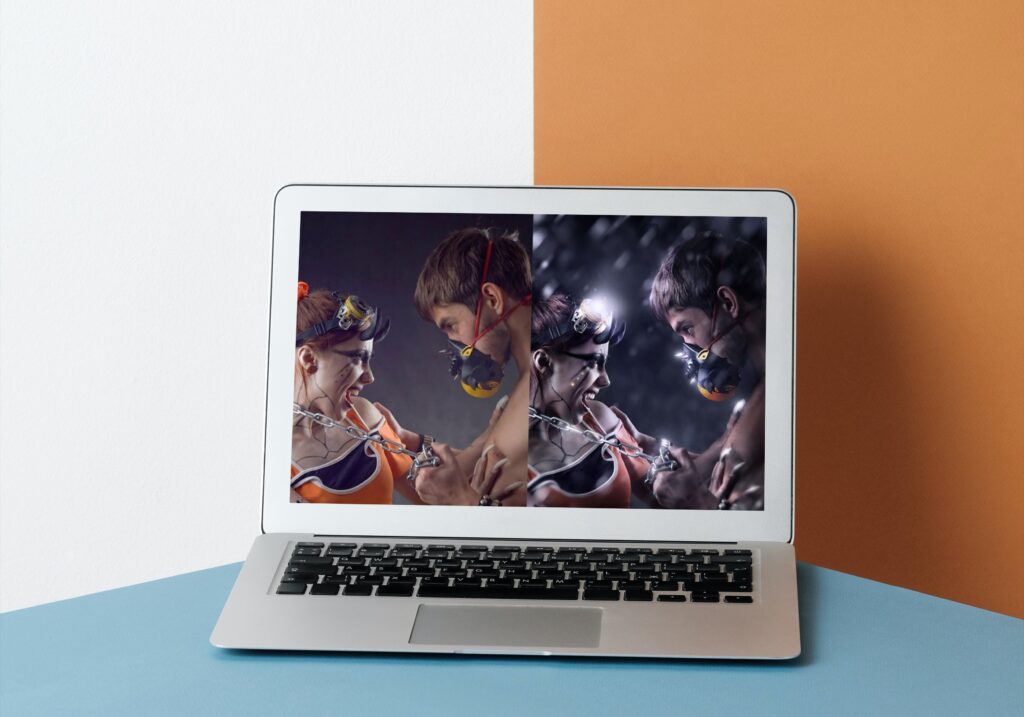
So what we end up with is this box, and we can see on the left-hand side, we’ve got the before image and on the right-hand side, we’ve got the after image and more, this allows us to do is upload it before image, which displays essentially on the left and the after image on the right.
And as we move this slider, we can scroll between before and after image. Now, in this example, all it does is just adds an overlay.
So it’s it’s, it’s light on the after image and it’s dark on the before image. Actually, what we want to do is have a, an actual good example of before and after.
So once we’ve put this in place, you’ll see this box appears on the left-hand side and we’ve got the space to add a before image and a space to add an after image.
Now, when we click on the before Mich box, you can choose from our selection of hundreds and hundreds of stock images all the images that are already added to the template as well, or you can choose to upload your own image.
So for example, if you wanted to show before and after images of your client’s actual haircuts or their nails or any other beauty treatments, you can upload those images yourself.
If it was perhaps a before and after image of an exercise or diet related activity, then you could also upload your own images here and show those before and afters.
So all you need to do is select the image. So let’s say I’m going to select this image from my before, and then we’re going to scroll down and we’re going to select again.
And let’s say, we select this one as the after image. Now there are a couple of other things you can do.
You can change the label. So instead of being before, you can change that to whatever else you want it to be in, same for after.
And if we click on design at the top here, we can make some changes here as well. So you can change how, why do you want the images to be, and the slider color?
So that’s this, this is the actual slider, and you can add labels, animations, and spacing, so you can change the padding and the margin around the before and after content.
So once you’re happy with that close the box and that’s it, you are done. So you see on the left-hand side, we’ve got the before and on the right hand side, the after, and we can slide over the top.
And this is your before and after picture. So it might be now that you want to add some information that makes that nice and clear to the users.
So perhaps we’re going to go back up to widgets here, and we might want to add a title. So let’s come down to basics and we could add some text or an H one title that some Texas drug is over here.
And we could add some information client before and after photos. And let’s just highlight that and we can make that much bigger and then central line it and make it bold.
And then we want more to add some spacing. So let’s add a spacer, a little bit of a gap above, and we can change the size of this gap.
So let’s change it to 30 pixels and then let’s add another space underneath. Okay. And then let’s make that 50.
So now we’ve got a title and we’ve got the client before and after photos box. And if you wanted to, you could add some more information.
You could add a little bit more text, but the under the box here, check out these images or latest customers, so changes, et cetera.
And there you go. That’s how you add a before. And after photo to your website, you can add this to any page.
You can add it to a blank template. You can add it to existing pages. You can add it to new pages.
And it works on all of the gen up digital website, builder templates that we have. So if you have any questions about how to do do this, or use this template, then personal questions in the blog, or get in contact with us on our website.
Once you’ve finished creating this, you can preview your website and see how it looks on different devices. All of our websites are optimized for mobile as well.

Responses